CARTOONITE Released Year
CARTOONITE 2023

Buckle up, PC gamers! Whether you’re a fan of high-octane arcade racers, realistic sims, or open-world cruising, the world of driving games on PC has something for everyone. From iconic classics to modern masterpieces, this list of the 50 best driving games for PC in 2025 will fuel your need for speed. Let’s dive into the ultimate driving experiences, covering a mix of genres, styles, and adrenaline-pumping action, curated for every type of virtual driver.
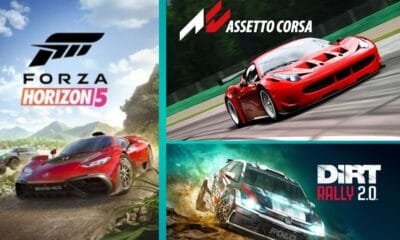
1. Forza Horizon 5
Developer: Playground Games
Genre: Open-World Arcade Racing
Set in a vibrant, expansive Mexico, Forza Horizon 5 offers a massive open world with deserts, jungles, and cities. Its stunning visuals, diverse car roster, and accessible yet thrilling driving mechanics make it a must-play.
2. Assetto Corsa
Developer: Kunos Simulazioni
Genre: Racing Simulation
A sim racer’s dream, Assetto Corsa delivers laser-accurate physics and a modding community that keeps it fresh with new cars and tracks. It’s a staple for anyone with a racing wheel.
3. iRacing
Developer: iRacing.com Motorsport Simulations
Genre: Racing Simulation
The gold standard for competitive sim racing, iRacing offers unmatched realism and online multiplayer. Its subscription model and DLC tracks are worth it for serious racers.
4. Forza Motorsport
Developer: Turn 10 Studios
Genre: Racing Simulation
Balancing accessibility and realism, Forza Motorsport is a gorgeous sim-lite racer with tight controls and a rewarding career mode. Perfect for newcomers and veterans alike.
5. Dirt Rally 2.0
Developer: Codemasters
Genre: Rally Simulation
With challenging off-road handling and dynamic weather, Dirt Rally 2.0 tests your skills on muddy tracks and treacherous terrain. It’s as intense as rally racing gets.
6. BeamNG.drive
Developer: BeamNG
Genre: Physics-Based Driving Simulation
Known for its hyper-realistic crash physics, BeamNG.drive is both a sandbox for chaos and a serious driving sim with endless modding possibilities.
7. Euro Truck Simulator 2
Developer: SCS Software
Genre: Truck Simulation
A relaxing yet immersive trucking experience, Euro Truck Simulator 2 lets you haul cargo across Europe with realistic mechanics and a vibrant modding community.
8. American Truck Simulator
Developer: SCS Software
Genre: Truck Simulation
Cruise through America’s highways in this calming simulator. Customizable trucks and varied landscapes make every journey visually spectacular.
9. F1 22
Developer: Codemasters
Genre: Racing Simulation
Officially licensed for the 2022 Formula One season, F1 22 delivers high-speed thrills with authentic tracks and realistic handling.
10. Burnout Paradise Remastered
Developer: Criterion Games
Genre: Arcade Racing
This open-world arcade classic is all about speed, stunts, and spectacular crashes. The remastered version adds enhanced visuals and Big Surf Island.
11. Need for Speed Heat
Developer: Ghost Games
Genre: Arcade Racing
With a vibrant day-night cycle and intense police chases, Need for Speed Heat blends tuner culture with thrilling races.
12. Wreckfest
Developer: Bugbear Entertainment
Genre: Demolition Derby Racing
Smash your way to victory in Wreckfest, where crashing is as fun as racing. Its robust physics and chaotic races are a blast.
13. TrackMania 2020
Developer: Ubisoft Nadeo
Genre: Arcade Racing
Featuring wild tracks and daily challenges, TrackMania 2020 is perfect for players who love creative courses and precision driving.
14. Gran Turismo 4 (via Emulator)
Developer: Polyphony Digital
Genre: Racing Simulation
A PlayStation 2 classic playable via emulator, Gran Turismo 4 offers deep car customization and realistic handling.
15. Richard Burns Rally
Developer: Warthog Games
Genre: Rally Simulation
A cult favorite among rally purists, this game’s challenging physics and active modding community keep it alive.
16. RaceRoom Racing Experience
Developer: Sector3 Studios
Genre: Racing Simulation
A free-to-play sim with excellent physics, RaceRoom is a great entry point for sim racing, though additional content requires payment.
17. SnowRunner
Developer: Saber Interactive
Genre: Off-Road Simulation
Tackle extreme terrains with heavy trucks in SnowRunner. Its realistic physics and cooperative gameplay make it uniquely engaging.
18. The Crew Motorfest
Developer: Ubisoft Ivory Tower
Genre: Open-World Arcade Racing
Set in a Hawaiian paradise, The Crew Motorfest offers diverse vehicles and vibrant races, making it a fun open-world racer.
19. Hotshot Racing
Developer: Sumo Digital
Genre: Arcade Racing
A retro-inspired racer with powersliding gameplay, Hotshot Racing is a nostalgic nod to the OutRun era.
20. Lego 2K Drive
Developer: Visual Concepts
Genre: Arcade Racing
This imaginative kart racer lets you transform vehicles and race in colorful, blocky open worlds. Pure fun for all ages.
21. Project CARS 2
Developer: Slightly Mad Studios
Genre: Racing Simulation
With a wide range of cars and dynamic weather, Project CARS 2 offers a deep sim experience with stunning visuals.
22. Driver: San Francisco
Developer: Ubisoft Reflections
Genre: Open-World Arcade Racing
A unique open-world racer with a “shift” mechanic that lets you swap cars instantly, set in a stylish ‘70s-inspired San Francisco.
23. rFactor 2
Developer: Studio 397
Genre: Racing Simulation
Used by professional racers, rFactor 2 boasts advanced physics, tire wear, and force feedback for an authentic sim experience.
24. EA Sports WRC
Developer: Codemasters
Genre: Rally Simulation
Celebrating 50 years of the World Rally Championship, this game offers a robust car list and a career mode for rally fans.
25. Tokyo Xtreme Racer
Developer: Genki
Genre: Arcade Racing
A 2025 Early Access hit, this game brings back Japanese highway racing with old-school vibes and modern polish.
26. RoadCraft
Developer: Pixel Dash Studios
Genre: Simulation/Strategy
Rebuild post-disaster landscapes by constructing roads and driving vehicles. Best enjoyed with friends for cooperative fun.
27. CarX Drift Racing 2
Developer: CarX Technologies
Genre: Drifting Simulation
A top-tier drifting sim with convincing handling, perfect for mobile or PC players using controllers.
28. City Car Driving
Developer: Forward Development
Genre: Driving Simulation
With a smart traffic system and realistic road rules, this sim is ideal for practicing real-world driving skills.
29. Split/Second
Developer: Black Rock Studio
Genre: Arcade Racing
This explosive racer lets you trigger environmental hazards to take out opponents, delivering cinematic thrills.
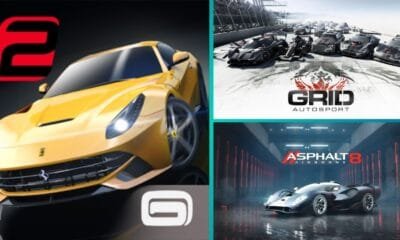
30. Grid Autosport
Developer: Codemasters
Genre: Racing Simulation
A balanced sim with tight controls and a variety of racing disciplines, from touring cars to open-wheel racers.
31. Automobilista 2
Developer: Reiza Studios
Genre: Racing Simulation
A lesser-known gem with excellent handling and diverse motorsport categories, playable with a controller or wheel.
32. Need for Speed Underground 2
Developer: EA Black Box
Genre: Arcade Racing
A legendary tuner classic, Need for Speed Underground 2 offers iconic street racing and customization. Playable via emulation or older PCs.
33. FlatOut 2
Developer: Bugbear Entertainment
Genre: Arcade/Demolition Racing
Chaotic races and destructible environments make FlatOut 2 a timeless arcade racer.
34. Pacific Drive
Developer: Ironwood Studios
Genre: Survival Driving
A unique survival game where you maintain a station wagon in a post-apocalyptic world, blending driving and resource management.
35. Mad Max
Developer: Avalanche Studios
Genre: Open-World Action/Driving
This open-world game combines vehicular combat and exploration in a post-apocalyptic wasteland.
36. Road Redemption
Developer: Pixel Dash Studios
Genre: Arcade Racing/Action
A spiritual successor to Road Rash, this game mixes motorbike racing with combat.
37. Slow Roads
Developer: Anslo
Genre: Driving Simulation
A minimalist, browser-based game for chill drives through procedurally generated worlds. Play at slowroads.io.
38. Test Drive Unlimited
Developer: Eden Games
Genre: Open-World Arcade Racing
A classic open-world racer set in Oahu, offering a laid-back driving experience. Playable via older PCs or emulation.
39. Midnight Club 3: DUB Edition
Developer: Rockstar San Diego
Genre: Arcade Racing
A street racing classic with deep customization, playable via emulation for nostalgic thrills.
40. Crazy Taxi
Developer: Hitmaker
Genre: Arcade Driving
This high-energy game tasks you with ferrying passengers in a wild taxi ride. Playable via emulation or older PCs.
41. Colin McRae Rally 2.0
Developer: Codemasters
Genre: Rally Simulation
A rally classic with tight controls and challenging stages, playable via emulation.
42. Need for Speed: Most Wanted (2005)
Developer: EA Black Box
Genre: Arcade Racing
Iconic for its police pursuits and blacklist races, this Need for Speed title remains a fan favorite.
43. OutRun 2006: Coast 2 Coast
Developer: Sumo Digital
Genre: Arcade Racing
A vibrant, drift-heavy racer with retro charm, playable via emulation or older PCs.
44. Rocket Racing
Developer: Psyonix
Genre: Arcade Racing
A Fortnite mode blending Rocket League mechanics with Mario Kart-style racing, free to play.
45. Art of Rally
Developer: Funselektor Labs
Genre: Arcade Rally
A stylized rally game with a retro aesthetic, perfect for casual yet engaging drives.
46. Extreme Off-Road Cars 2
Developer: Brain Software
Genre: Off-Road Simulation
A browser-based game with challenging off-road trails, ideal for quick sessions.
47. Top Drives
Developer: Hutch Games
Genre: Strategy/Card-Based Racing
A unique card-based racer where you collect and race cars strategically. Free to play on mobile or PC.
48. Parallel Park
Developer: Unknown
Genre: Driving Simulation
A simple Flash game for practicing parallel parking, great for real-world skill-building.
49. Autobahn Police Simulator
Developer: Z-Software
Genre: Driving Simulation
Play as a highway patrol officer, managing accidents and enforcing laws in a realistic setting.
50. Keep Driving
Developer: YCJY Games
Genre: RPG/Driving
An upcoming pixel-art RPG with a nostalgic road trip vibe, inspired by Oregon Trail. Wishlist it on Steam for its 2025 release.
Why These Games Stand Out
This list spans arcade racers, hardcore sims, open-world adventures, and unique driving experiences. Whether you’re chasing lap times in iRacing, drifting through Mexico in Forza Horizon 5, or hauling cargo in Euro Truck Simulator 2, there’s a game for every mood. Many titles, like Assetto Corsa and BeamNG.drive, thrive thanks to dedicated modding communities, while others, like Mario Kart 8 Deluxe (playable via emulation), offer timeless multiplayer fun.
For the best experience, consider investing in a racing wheel like the Logitech G29 for sims or a controller for arcade titles. Check out Steam sales for deals on classics like Assetto Corsa or Need for Speed Underground 2.
Final Thoughts
The PC driving game scene in 2025 is thriving, with a mix of cutting-edge graphics, realistic physics, and nostalgic gems. Whether you’re a speed demon or a chill cruiser, these 50 games offer endless hours of fun. What’s your favorite driving game? Drop a comment below and let us know what’s fueling your virtual adventures!
Happy racing, and see you on the leaderboards!
As a gaming enthusiast with a low-end PC, you don’t have to miss out on the thrill of car racing games. There are plenty of excellent titles that can run smoothly on older hardware or systems with limited resources, such as 2-4 GB of RAM, integrated graphics, or older processors. In this blog post, I’ve compiled a list of 50 car racing games that are perfect for low-end PCs, ensuring you can enjoy high-octane action without breaking the bank or upgrading your rig. Whether you’re into arcade-style racing, realistic simulations, rally racing, or demolition derbies, there’s something here for everyone.
Why These Games?
Before diving into the list, let’s clarify what makes a game suitable for a low-end PC:
- Low System Requirements: These games can run on systems with older processors, integrated graphics, and limited RAM (typically 2-4 GB).
- Variety of Genres: From arcade racers to realistic simulations, the list includes a wide range of racing styles to cater to different preferences.
- Accessibility: Many of these games are either free, affordable, or older titles that are easy to find and install.
- Performance: These games are known to run smoothly on low-end hardware, often with adjustable graphics settings to ensure compatibility.
The games listed below have been sourced from reputable gaming websites and community recommendations, ensuring they are suitable for low-end PCs. Let’s get to the list!
50 Car Racing Games for Low-End PCs
| # | Game Title | Why It’s Great for Low-End PCs | Key Features |
|---|---|---|---|
| 1 | GT Racing 2 | Lightweight with realistic dynamics, runs on modest hardware. | 71 licensed cars, 13 tracks, steering/braking assistance. |
| 2 | GRID Autosport | Scalable graphics for lower-end systems, a Codemasters classic. | Over 100 cars and tracks, realistic physics, various racing styles. |
| 3 | Asphalt 8: Airborne | Optimized mobile game, playable on PC via emulators. | Over 300 cars/bikes, stunning visuals, arcade racing. |
| 4 | Need for Speed: Shift 2 Unleashed | Runs well on minimum settings, great for competitive racing. | 140 cars, FIA GT3/GT1 championships, improved crash physics. |
| 5 | rFactor 2 | Realistic sim with tweakable settings for low-end PCs. | Accurate car/track models, online events, modding community. |
| 6 | Asphalt 9: Legends | Mobile-first but runs on PC with minimal requirements. | Stunning visuals, addictive gameplay, online multiplayer. |
| 7 | Horizon Chase | Retro-inspired with simple graphics, low system demands. | 80s nostalgia, vibrant colors, adrenaline-pumping races. |
| 8 | iRacing | Optimized for competitive racing, runs on low settings. | Real-life drivers, online leagues, steep learning curve. |
| 9 | The Crew | Open-world racer with a massive map, runs well on low-end systems. | Linear storytelling, diverse races, variety of vehicles. |
| 10 | Assetto Corsa | Sim racer with excellent physics, optimizable for low-end hardware. | Over 170 cars, realistic handling, strong modding community. |
| 11 | Wreckfest | Demolition derby with simple graphics, low requirements. | No rules, customizable cars, chaotic fun. |
| 12 | Project CARS | Runs on low settings with decent performance. | NASCAR, Indycars, various tracks including Nordschleife. |
| 13 | Need for Speed: Hot Pursuit (2010) | Classic reboot with stunning graphics, runs well today. | Police chases, open-world California, multiplayer modes. |
| 14 | F1 2019 | Formula 1 sim with crisp graphics, low memory needs. | Realistic physics, F1 cars, career mode. |
| 15 | Forza Horizon 4 | Runs at 30 FPS with 4GB RAM on low settings. | Stunning visuals, over 400 cars, massive open-world. |
| 16 | Burnout Paradise | Arcade racer, runs flawlessly on low to mid-spec PCs. | Open-world racing, stunts, crash mechanics. |
| 17 | FlatOut | Demolition derby with engaging gameplay, low requirements. | Standard races, demolition derbies, “human cannonball” mode. |
| 18 | FlatOut 2 | Upgraded visuals and physics, still lightweight. | Destruction-focused gameplay, upgraded tracks. |
| 19 | Star Wars Episode I Racer | Classic racer, runs on any device, even “potato PCs.” | Podracing from Star Wars, simple yet fun gameplay. |
| 20 | Test Drive Unlimited | Open-world racer, works on notebooks and laptops. | Massive map, car collection, online multiplayer. |
| 21 | Test Drive Unlimited 2 | Optimized for lower-end systems, like its predecessor. | Larger map, more cars, improved visuals. |
| 22 | Fuel | Open-world arcade racer with a huge map, low-end friendly. | Off-road racing across a vast landscape. |
| 23 | Blur | Combat racer, very low-end friendly. | Power-ups, destruction, intense races. |
| 24 | Need for Speed: Carbon | Classic, runs on any machine by today’s standards. | Underground racing, customization, police chases. |
| 25 | Midnight Club II | Low-end friendly with solid gameplay. | Street racing in various cities, variety of cars. |
| 26 | Juiced | Runs on low to mid-end PCs, including laptops. | Street racing, customization, vibrant soundtrack. |
| 27 | Juiced 2 | Lightweight and fun, like the first game. | More tracks, cars, improved visuals. |
| 28 | L.A. Street Racing | Runs on anything, even a Pentium 4 PC. | Underground racing, focus on customization. |
| 29 | Split/Second | Low-end friendly combat racer with destruction mechanics. | Destroy environments to gain an edge. |
| 30 | Sega Rally Revo | Arcade off-road racer, runs on any machine. | Various tracks and cars, simple gameplay. |
| 31 | Need for Speed: Hot Pursuit 2 | Classic, runs on any machine today. | Arcade racing with police pursuits. |
| 32 | OutRun 2006: Coast 2 Coast | Lightweight arcade racer with 15 vehicles. | Beautiful tracks, simple fun gameplay. |
| 33 | Re-Volt | RC racing game, aged well, runs smoothly. | 28 cars, 13 tracks, nostalgic fun. |
| 34 | Richard Burns Rally | Realistic rally game, runs on any device. | Accurate physics, dedicated community. |
| 35 | WRC 7 FIA World Rally Championship | Runs on low settings with modest hardware. | Based on 2017 World Rally season, realistic stages. |
| 36 | Road Redemption | Designed for low-powered machines with 2GB VRAM GPUs. | Post-apocalyptic biker racing with combat. |
| 37 | Descenders | Downhill bike racer with simple graphics. | Procedurally generated tracks, stunt-based scoring. |
| 38 | Need for Speed: Most Wanted (2012) | Runs well on older PCs and laptops. | Open-world racing, focus on evasion. |
| 39 | Motor Town: Behind the Wheel | Driving simulator with low requirements. | Realistic mechanics, Early Access development. |
| 40 | Art of Rally | Low-poly art style, very lightweight. | Over 70 venues, realistic rally mechanics. |
| 41 | Simraceway | Free online racing simulator, good performance. | Wide variety of cars and tracks, realistic physics. |
| 42 | Live for Speed | Realistic sim, runs well on low-end systems. | Huge community, modding support, fictional cars. |
| 43 | Dolphinity Racer | Free, lightweight racing simulator. | Simple gameplay, small modding community. |
| 44 | Street Legal Racing Redline (SLRR) | Open-world racing, huge modding community. | Realistic damage, fictional cars. |
| 45 | GTR Evolution | Great for weak PCs, modding support. | Realistic racing, various cars and tracks. |
| 46 | rFactor | Best for weak PCs due to modding community. | Realistic physics, wide range of mods. |
| 47 | Need for Speed: Porsche Unleashed | Classic, runs on any low-end PC. | Porsche-focused racing, great soundtrack. |
| 48 | Need for Speed: Underground 2 | Classic with moderate system requirements. | Street racing, extensive customization. |
| 49 | Hotshot Racing | Retro-style racer with simple graphics. | Powersliding gameplay, nostalgic visuals. |
| 50 | Forza Horizon 2 | Older Forza title, runs better than Horizon 4 on low-end systems. | Open-world racing, variety of cars and events. |
Tips for Playing on Low-End PCs
- Adjust Graphics Settings: Lower resolution, disable shadows, and reduce texture quality to improve performance.
- Check System Requirements: Always verify minimum requirements on platforms like Steam or GOG before purchasing.
- Use Mods: Games like rFactor and Assetto Corsa have modding communities that can add lightweight content.
- Free Options: Titles like Simraceway and Dolphinity Racer are free, making them great starting points.
Final Thoughts
This list of 50 car racing games proves that you don’t need a high-end PC to enjoy thrilling races. From arcade classics like Burnout Paradise to realistic simulators like Assetto Corsa, there’s something for every type of racer. Many of these games are available at low cost or even for free, making them perfect for budget-conscious gamers. Start with some of these titles to expand your gaming library without upgrading your hardware, and enjoy the ride!
Sources
- Gamers Decide: Best Racing Games for Low-End PC
- Altar of Gaming: Best Racing Games for Low-End PC
- GameRant: Best Racing Games for Low-End PCs
- CarThrottle: Racing Games for Low-End PCs
- Reddit: r/racinggames
- Quora: Suggested Car Racing Games for Low-End PC
Happy racing!

There’s something magical about hosting an outdoor party—fresh air, open skies, and the freedom to let loose. Whether it’s a backyard barbecue, a garden birthday bash, or a casual summer get-together, having the right essentials can make or break your event. From seating to snacks, we’ve rounded up the top 10 must-haves to ensure your outdoor party is a hit. Let’s dive in!
Setting the Scene
1. Comfortable Seating
No one wants to stand all day, so comfy seating is a must. Folding chairs are portable and budget-friendly, while outdoor cushions or bean bags add a cozy vibe. Arrange seats in small clusters to spark conversation and keep guests mingling. Pro tip: mix and match styles for a fun, eclectic look.


2. Weather-Proof Shelter
Mother Nature can be unpredictable, so a sturdy shelter is key. A pop-up canopy offers shade on sunny days, while a waterproof tent keeps the party going through a light drizzle. Choose a size that fits your guest list and ensure it’s anchored securely. Bonus: decorate with fairy lights for extra charm.


3. Outdoor Lighting
As the sun sets, good lighting keeps the mood alive and prevents trips in the dark. String lights create a warm glow, solar-powered garden stakes are eco-friendly, and lanterns add a rustic touch. Place lights along pathways and around seating areas for both safety and ambiance.
Food and Drink Essentials
4. Portable Grill or BBQ
Nothing says outdoor party like the sizzle of a grill. A portable gas or charcoal grill is perfect for whipping up burgers, veggies, or kebabs. Ensure it’s clean and fueled up before guests arrive, and keep a fire extinguisher nearby for safety. Your guests’ taste buds will thank you!

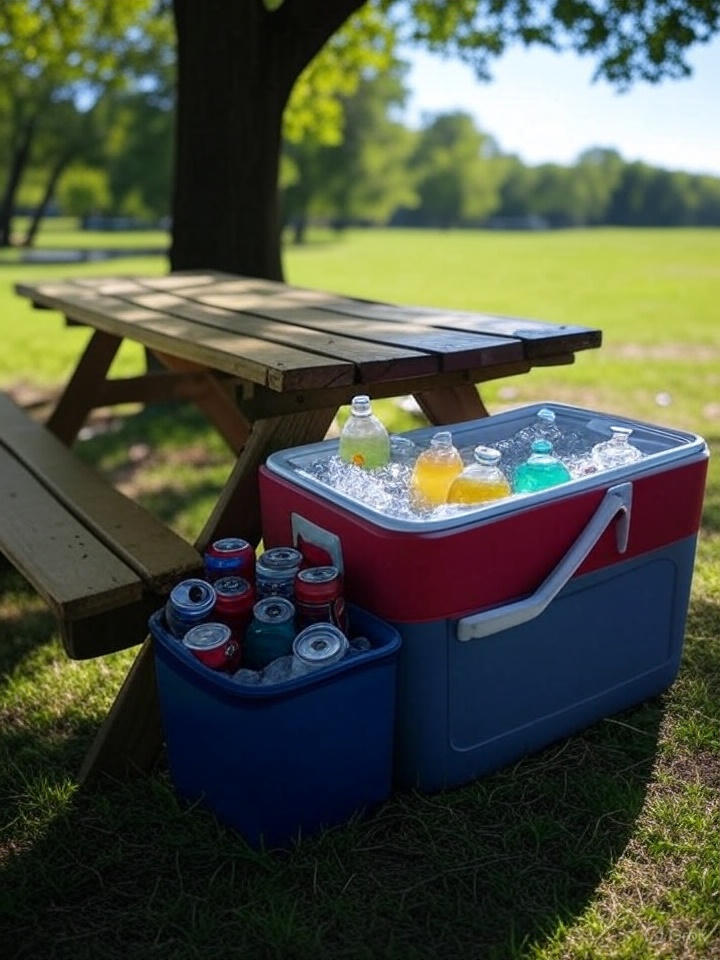
5. Cooler with Ice
Keep drinks and perishables chilled with a reliable cooler. Hard-shell coolers are durable for large gatherings, while insulated bags work for smaller events. Fill with ice packs or cubes and organize drinks for easy access. Tip: add a separate cooler for snacks like fruit or dips to avoid cross-contamination.
6. Reusable Tableware
Ditch the flimsy paper plates for eco-friendly, reusable tableware. Bamboo plates, stainless steel cups, and sturdy plastic utensils are durable and sustainable. They’re easy to clean and store, making post-party cleanup a breeze. Plus, they elevate the aesthetic of your spread.

Entertainment and Comfort
7. Outdoor Speaker System
Music sets the vibe, so a quality Bluetooth speaker is non-negotiable. Look for a water-resistant model with long battery life to keep the tunes flowing. Create a playlist with crowd-pleasers, but keep the volume neighbor-friendly. Your guests will be dancing in no time!

8. Games and Activities
Keep everyone entertained with outdoor games. Cornhole and badminton are easy to set up, while a DIY photo booth with props adds a fun, interactive element. Choose activities that suit all ages to ensure everyone feels included, from kids to grandparents.
Practical Necessities
9. Insect Repellent
Don’t let mosquitoes crash your party. Citronella candles add ambiance while repelling bugs, and natural sprays are gentle for all guests. Set up repellent stations around the perimeter and remind folks to reapply. A bite-free party is a happy party!

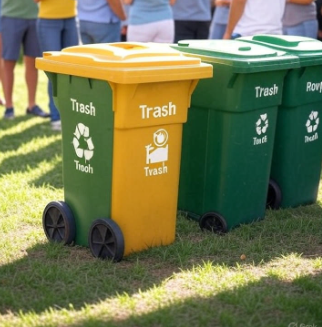
10. Trash and Recycling Bins
Keep your space tidy with clearly labeled trash and recycling bins. Portable trash bags work for small gatherings, while larger bins suit big crowds. Place them in convenient spots and empty them regularly to avoid overflow. Cleanup will be a snap!
Conclusion
With these 10 outdoor party essentials, you’re ready to host a memorable bash that’ll have guests talking for weeks. Plan ahead, add your personal flair, and let the good times roll. What’s your go-to outdoor party must-have? Drop your tips in the comments below!
Call to Action: Share your favorite outdoor party ideas or essentials in the comments, and check out our other party-planning guides for more inspiration!

The 50 Best Driving Games for PC in 2025: Ultimate Guide for Racing Enthusiasts
Buckle up, PC gamers! Whether you’re a fan of high-octane arcade racers, realistic sims, or open-world cruising, the world of...

50 Car Racing Games for Low-End PCs: A Comprehensive Guide for Budget Gamers
As a gaming enthusiast with a low-end PC, you don’t have to miss out on the thrill of car racing...


10 Outdoor Party Essentials for an Unforgettable Bash
There’s something magical about hosting an outdoor party—fresh air, open skies, and the freedom to let loose. Whether it’s a...

 Games Like2 years ago
Best Games Like Unblocked Games 77 | Top Alternatives
- Gaming1 year ago
Free Fire Best Sensitivity Settings For Headshot
- Top 102 years ago
The Top 20 Android Horror Games to Play with Friends

 Game Room Ideas12 months ago
52 Incredible Game Room Ideas to Elevate Your Home Entertainment
- Tutorials2 years ago
How to Fix the PS5 Green Screen – Tips To Try
- Tutorials12 months ago
How to Play Fishbowl Game: Rules, Regulations, and Tips
- Top 1012 months ago
10 Best Offline Mobile Games For Long Car Rides 2024
- Top 102 years ago
The 25 Best Offline iPhone Games to Play Without Internet